Wednesday 26 January 2011

Delicious. January 2011 - Mexican-style Turkey Burgers

Well, I almost forgot to make another recipe out of this issue for January. It had gotten tucked away at the end of last year in one of my cleaning frenzies so wasn't sitting out to remind me that it was a double issue. 

I had planned on making Jamie Oliver's Warm Eggplant, Harissa & Pomegranate salad right from the first time I looked at this issue. It is not quite as easy as it sounds but certainly not too difficult. I do love the harissa paste that I purchased from ideli.com.au. It has a wonderful flavour and it is not too hot. I really do want to make this dish but I haven't yet. Not really sure why. 

I really liked the sound of the Quince-glazed Chicken with Cranberry, Manchego & Pine nut salad. I am not overly keen on pine nuts, but they are easily replace with another nut or seed, perhaps sunflower seeds or pumpkin seeds. I am sure that both would work nicely. I had, however, already made the quince-glazed spatchcocks recently and did not want to make something so similar again. 

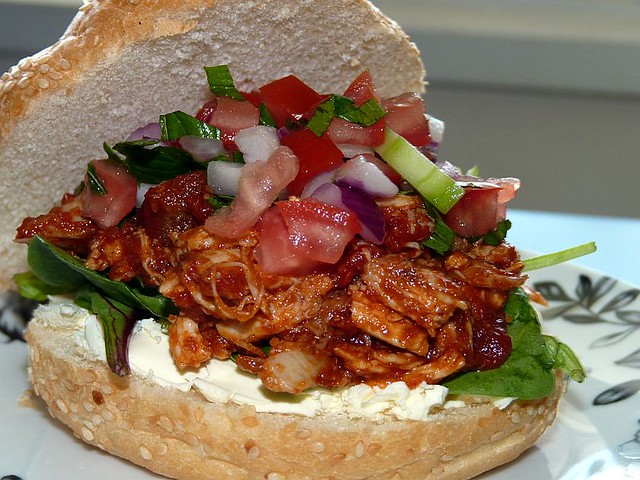
What I really wanted was something that had some leftovers that would be good for easy cold lunches. The Mexican-style Turkey Burgers were just what I was looking for. It really wasn't a burger as such. More of a warm (or cold) sandwich filling of shredded in a Mexican-style sauce. It was very good as both the burger and on following days as a filling in wraps. I didn't have any turkey so I used shredded chicken in the filling. I did have a couple of avocados but when cut open they weren't any good inside. So I used some cream cheese on the bun and it was really nice. This is definitely one to make with leftover roast chicken or turkey. 

Mexican-style Turkey Burgers

  • 1 tsp each ground cumin, ground coriander and chilli powder
  • 1 tsp smoked paprika 
  • 2 tbsp brown sugar 
  • 2 tbsp olive oil 
  • 1/2 c. tomato passata 
  • 1 c. shredded roast turkey (I used 2 cups shredded chicken and there was still plenty of sauce)
  • 2 vine-ripened tomatoes, seeds removed, chopped 
  • 1/4 telegraph cucumber, chopped 
  • 1/2 red onion, chopped
  • 1/4 c. mint 
  • Juice of 2 limes
  • 2 avocados
  • 1 garlic clove, crushed 
  • 1 butter lettuce, leaves separated 
  • 4 crunchy bread rolls, split
 Method:
  • Place the spices, brown sugar, oil and passata in a small saucepan with some sea salt and ground pepper. Bring to a simmer, then reduce to low and cook stirring occasionally for 5 minutes or until thickened. Transfer to a bowl, add turkey and mix. Allow to cool slightly. 
  • Combine tomato, cucumber, onion, mint and the juice of 1 lime. Season and set aside. 
  • Mash avocados with garlic and juice of 1 lime. Season to taste. 
  • Spread avocado mixture on the base of the rolls, then top with lettuce, turkey mixture and finally the tomato mixture.

Tuesday 25 January 2011

Bill's Lamb Cutlets with Skordalia and Parsley salad

Well, summer has arrived finally. Goodness it has been hot here the past few days. It is so draining and I haven't felt like doing much of anything lately. I guess however the heat really did have to turn up at some point. It is just such a shock to the system when it turns up all at once and doesn't gradually heat up. 

It was time to get back to Bills. I have a couple of other recipes that I have made from Bills Sydney Food to post but I just had to post this one from last night first. I will admit that a day of 35 C temperatures was probably not the time to be making this. I was so hot by the time I had finished cooking and served it up that I thought I was going to melt. The flavours of this meal completely made up for all the heat in  the cooking and the eating though. 

I had started this on Sunday afternoon but decided that it would be better to give the lamb rack longer in the marinade so left it overnight and cooked it last night. I think this really was worth the extra time in the marinade, even though I did have to find something else to make on Sunday night. Thankfully though, this was a really quick recipe to make so was easy to make after work. The lamb needed longer to cook than Bill's recipe suggested. I cooked for longer but it was still way too pink for my liking. I find it difficult to determine when a rack is done to my liking. After the standing time, I sliced the rack into cutlets for the pictures, while doing this I reheated my fry pan and then cooked the cutlets for about 2 minutes on each side so they were perfect after that. I really enjoyed the flavours, the harissa went perfectly with the lamb. 

I was most impressed with the skordalia though. It truly was the highlight of the meal. The gloriously creamy lemony garlicy mashed potatoes. Done in a processor while pouring in a bunch of olive oil. It was sticky and very much the consistency of homemade mayonnaise however it tasted incredible. I have to admit that I am not sure it is a good thing to have discovered this incredible side dish or not. Being packed full of olive oil it is certainly not healthy but oh my goodness it is so, so good. Then again isn't everything naughty good. This will be saved for special occasions only. The raw garlic in it was fabulous but I would love to try it with some roasted garlic or even better some of the cold-smoked Australian garlic that I have in the cupboard. 

Lamb Cutlets 
1 tbsp tomato paste 
1 tbsp harissa paste 
3 tbsp olive oil 
2 garlic cloves, crushed with salt
freshly ground black pepper
4 x 4 cutlet racks of lamb (I had a 1 x 5 cutlet rack and it was plenty for 2 meals) 

Combine first 5 ingredients in a bowl and then pour over lamb and rub in. Marinate in fridge for at least 1 hour, preferably overnight. 
Pre-heat oven to 220C. 
Heat an oven proof frying pan until very hot. 
Place lamb racks, fat-side-down, in the pan and cook for 2 minutes. 
Turn racks over and place in the oven for 10 minutes (very rare, I left for 13 minutes but think that 18 would have been more to my liking). 
Remove from oven and rest for a further 10 minutes. 
Slice racks into cutlets. 


Skordalia

3 potatoes, peeled and diced 
4 cloves garlic
pinch of salt 
1 tbsp lemon juice 
3/4 c. olive oil 
1/4 c. milk

Cook potatoes in boiling water until soft. Drain well. 
Place in food processor with garlic, lemon juice and salt and start processing. 
Drizzle oil in, in a slow stream, as for mayonnaise, until it is all incorporated. 
Add milk slowly until combined. 
Serve at room temperature. 


Parsley Salad 

2 white onions, finely sliced (I used red) 
1 tsp sea salt 
1/2 c. parsley, roughly chopped 
1/4 c. mint leaves, roughly chopped 
1 tsp sumac 
1 tbsp olive oil 

Place onion and salt in a bowl and toss to combine. Leave for 5 minutes and then rinse and dry. 
Mix onions with parsley, mint and sumac. Drizzle with oil just prior to serving. 
(This would have been better with a drizzle of vinegar or lemon juice in place of the oil or sub half the oil for lemon juice)

Saturday 22 January 2011

Re-inventing the Lamginton - the Rolled Laminglova

You may remember last year that I participated in the delightful Mr P's Re-invent the Lamington challenge. It was so much fun and I delighted in making jelly cakes although I would have loved to win the Welsh dragon cookie cutter. There were some amazing things done by other participants in the challenge. There were many that I would love to make but I just haven't gotten around to it. I was super excited to see that Mr P is holding his Re-invent the Lamington challenge again this year and offering another excellent prize. I really wanted to participate again this year. 

I knew, after the creativity of some of last year's entries that I would really have to step it up a notch in the creativity stakes. While the shaped jelly cakes were good they were still a bit traditional. My first thought, since it has finally started to heat up here, was to do ice cream lamingtons. Since I have the ice cream attachment for my KitchenAid now I thought that it would be perfect to use that. However looking at last year's entrants in the challenge there was already an ice cream lamington. Although that one was different to what I had been thinking of making I decided to make something else. 

Lamingtons are considered quintessentially Australian so I sat down and had a bit of a think about what else is considered quintessentially Australian and came up with the pavlova. I love pavlova, and they are so easy to make. I considered just making mini pavlovas and stacking them on top of a piece of sponge cake with some cream and coating with chocolate icing and coconut as normal. I decided not to go that way for a couple of reasons, the first being that I wasn't sure how the pavlova would stand up to being rolled in chocolate icing and coconut. I thought it may start to disintegrate. The other, more important, reason was that I thought that the whole thing would just be unbearably sweet. Sweet to the point of not being able to eat it and what would be the point of that. 

I have always wanted to try making a rolled pavlova. A pavlova mixture baked in a swiss roll tin and then rolled up with cream and and fruit. I decided that this would be a much better option with some whipped ganache piped on top and then sprinkled with toasted flaked coconut it would become a Rolled Laminglova. First I made the ganache. 

Whipped Ganache
  • 100g good-quality dark chocolate, roughly chopped     
  • 20g unsalted butter 
  • 1/3 cup  thickened cream
  1. Combine all ingredients in a small saucepan and place over low heat, stirring occasionally, until melted and combined. 
  2. Allow to cool for 5 minutes before placing in the fridge to chill completely. 
  3. Once chilled and thickened, use electric hand beaters to beat until thick and creamy.

I then made the pavlova:
Rolled pavlova
  • 4 egg whites
  • 1 cup (200g) caster sugar
  • 2 tsp cornflour
  • 1 tsp white vinegar
  • 1/2 cup thickened cream
  • 1 tbsp icing sugar mixture
  • 2 passionfruit 
  • 1 punnet strawberries, hulled & sliced
  • Caster sugar, extra, to dust 
  • Toasted flaked coconut 
  1. Preheat oven to 180°C. Grease and line a 25x30cm Swiss roll pan with baking paper, allowing the sides to overhang.
  2. Whisk the eggwhites in a clean, dry bowl until firm peaks form. Gradually add the sugar, one tablespoon at a time, beating well between each addition. Continue whisking until sugar completely dissolves. Add the cornflour and vinegar and gently fold with a metal spoon until just combined. Spoon into the prepared pan and smooth the surface. Bake in preheated oven for 10 minutes or until meringue just starts to brown.
  3. Place a clean tea towel on a clean work surface. Top with a large sheet of baking paper. Dust lightly with caster sugar. Turn the pavlova, top-side down, onto the dusted baking paper. Set aside for 20 minutes to cool.
  4. Meanwhile, whisk the cream until soft peaks form. Add the icing sugar and passionfruit then gently fold to combine. Spread the passionfruit cream evenly over the pavlova and top with half the sliced strawberries in rows about 2 cm apart. Starting at the short edge carefully roll pavlova, using the paper and tea towel as a guide, to enclose filling. Keep pavlova wrapped in baking paper and tea towel. Transfer to a tray and place in the fridge for 1 hour to chill. 
  5. Remove from fridge, unwrap and place on serving plate. 
  6. Place whipped ganache in a piping bag with a large star tip and pipe onto the top of the pavlova in whatever design you prefer. Sprinkle with toasted coconut.
  7. Serve with remaining sliced strawberries. 


Monday 17 January 2011

Jamie Oliver's Sexy Swedish Buns

I bought Jamie Oliver's Jamie does... book last year. I was so keen on the book that I paid almost full retail...shock horror. I adore it. In fact I think that I like it even more than Happy Days which was my previous favourite book of his. I also loved the television show that he did to accompany the book. His enthusiasm when in those amazing countries was just infectious. He really did make me want to jump on a plane to Morocco or Spain or wherever else he was. It all looked so much fun and, of course, tasty. 

I will admit that there was one reason that I bought this book and it was because of the Sexy Swedish Buns. The recipe sounded really good but the photos were what convinced me that I needed to buy the book and I needed to buy it right there and then. It did actually take a little while before I got around to making them though. It was, however, worth every cent to have this recipe permanently, along with so many others. The buns were absolutely divine. They turned out looking just like the picture in the book and they tasted so good. I would highly recommend making them. I didn't have fresh blueberries, as they were too expensive at the time, so I used frozen ones. I thawed them first, this is necessary as if they are not room temperature they will inhibit the rising of the dough. It is a very messy recipe to make, I used my pastry mat when I added the blueberry mix, if you have white benches like I do I think it could stain. The pasty mat worked well. I am definitely going to make these again. I am also looking forward to making more from this fantastic book.


Sunday 16 January 2011

Bill's Sydney Food

Slight change for my blog this year. I will continue to make at least one recipe (hopefully more) out off each new delicious. magazine that comes out. However, my project for this year is Bill's Sydney Food. I bought this fantastic book a couple of months ago now and I am in love with it. It is a gorgeous book with wonderful photos of both food and Sydney. The recipes are all from the menu of Bill Granger's bills cafe. On my first reading of the book I could see myself making almost everything from the book. So for this year I plan to make every recipe from this book. There are a number of seafood recipes but I decided early this year that I really want to include more seafood in my diet. Some of the recipes, especially the seafood ones, will be difficult to source the fresh ingredients for but I will do my best.

I have started off with the first recipe in the book, Ricotta Hotcakes with Honeycomb Butter, however I didn't follow it exactly. It was kind of a spur of the moment decision to make the recipe so I didn't have time, or the ingredients, to make the honeycomb butter. Instead I made a blueberry compote with a punnet of frozen blueberries, a sprinkle of sugar and a drizzle of vanilla. I cooked them over a low-medium heat, squashing some of the berries as it cooked. I thickened it very slightly with a touch of cornflour in a little bit of water. It was the perfect accompaniment to the wonderfully light, fluffy and delicious hotcakes. I just love pancakes/hotcakes. They evoke a raft of childhood memories. My overseas grandparents used to make pancakes every Sunday morning. My memories are of my grampa cooking the pancakes on the amazing electric flat plate griddle that they had. ( I would love to own one like it but have never seen anything like it) My gramma would cook the bacon and fry the eggs. Plenty of homemade butter, home made jams, jellies and syrups were on the table to eat it all with. If you weren't up for the first cooking, then everything was there for you to cook your own later on. Hmmm....I might just make myself some pancakes for breakfast tomorrow. 

Ricotta Hotcakes with Honeycomb Butter 

Ingredients 
 
Hotcakes
  • 1 1/3 cups Ricotta
  • 3/4 cup Milk
  • 4 Eggs separated
  • 1 cup Plain Flour
  • 1 teaspoon Baking powder
  • 1 Pinch of Salt
  • 50 g Butter
  • fresh strawberry halved
  • icing sugar for dusting
Honeycomb Butter
  • 250 g unsalted Butter softened
  • 100 g sugar honeycomb crushed with a rolling pin or a Crunchie bar
  • 2 tablespoons Honey
Method 
Hotcakes
  1. Place ricotta, milk and egg yolks in a mixing bowl and mix to combine.
  2. Sift the flour, baking powder and salt into a bowl.
  3. Add to the ricotta mixture and mix until just combined.
  4. Place egg whites in a clean dry bowl and beat until stiff peaks form.
  5. Fold egg whites through batter in two batches, with a large metal spoon.
  6. Lightly grease a large non-stick frying pan with a small portion of the butter and drop 2 tablespoons of batter per hotcake into the pan (don't cook more than 3 per batch).
  7. Cook over a low to medium heat for 2 minutes, or until hotcakes have golden undersides.
  8. Turn hotcakes and cook on the other side until golden and cooked through.
  9. Transfer to a plate and quickly assemble with other ingredients.
  10. Stack 3 hotcakes on a plate and top with strawberries and a slice of honeycomb butter.
  11. Dust with icing sugar.

Honeycomb Butter

  1. Place all ingredients in a food processor and blend until smooth.
  2. Shape into a log on plastic wrap, roll, seal and chill in a refrigerator for 2 hours.
  3. Store leftover honeycomb butter in the fridge for up to 24 hours, or in the freezer - it's great on toast.


Wednesday 12 January 2011

Not forgotten

To all those out there reading, I haven't forgotten about my beloved blog since the end of last year, I promise. I have just been in a bit of a funk. I will be back posting with some lovely cooking and a very special cake very soon. In the mean time here is what I have been photographing in my front yard.