Sunday 29 January 2012

January 2012 - Pork skewers with peanut noodle salad

Wow, it is nearly the end of the month already. It seems to have both flown by but dragged at the same time. I have a new accounting system to learn at work which has been keeping me busy. So I have been doing easy meals this month.

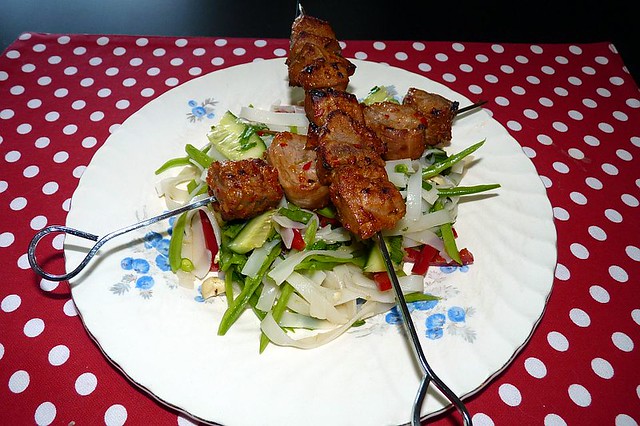
As usual this is a double issue so I had already made something for it for December. In previous years the December/January issues have been filled with Christmas recipes but this year there was a nice variety of other recipes. I did just realise though that both the recipe I made for December and the one for January were from the same feature by David Morgan. A variety of different menus. December was Moroccan, for January I went with the Vietnamese. These were both very good recipes. I particularly enjoyed the pork skewers. They were supposed to be barbecued but since I don't have a gas bottle for my barbecue I just grilled them instead. It was also a very thrifty meal since I had everything to make it in the house including pork fillet in the freezer. 

Pork Skewers 
Ingredients: 
  • 2 garlic cloves, crushed
  • 1/4 red onion, very finely chopped
  • 1 tbsp fish sauce 
  • zest & juice of 1/2 lime
  • 1 tbsp palm sugar or brown sugar 
  • 1 red chilli, seeds removed and finely sliced 
  • 500 g pork fillets, sliced into 3 cm pieces. 
Method: 
  • Combine everything in a non-reactive dish and leave to marinate for at least 1 hour. 
  • Remove pork from marinade and thread onto skewers. 
  • Cook under grill for 3 - 5 minutes each side or until cooked. 
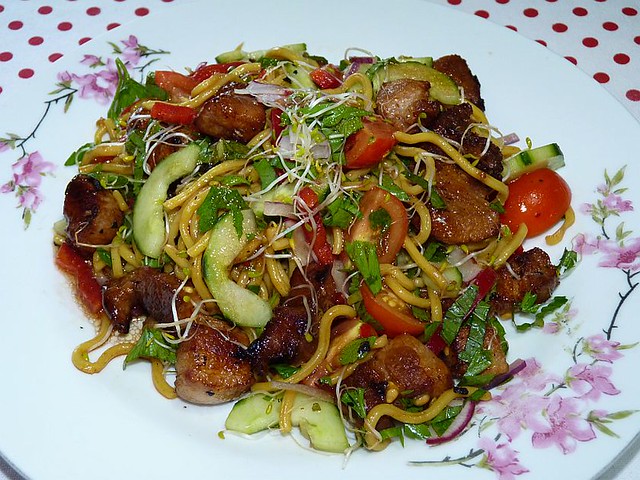
Peanut Noodle Salad

Ingredients:
  • 100 g dried thin rice stick noodles
  • 1/2 cucumber, roughly chopped 
  • 100 g snow peas, sliced
  • 1/4 red capsicum, sliced 
  • Handful mint and parsley leaves, chopped 
  • 50 g peanuts, roughly chopped (I used cashews) 
  • zest & juice of 1 lime
  • 2 tsp soy sauce 
  • 1 tsp brown sugar or palm sugar 
  • 2 tsp olive oil 
  • 2 drops sesame oil
Method: 
  • Soak rice noodles in boiling water until soft. Drain. 
  • Add cucumber, snow peas, capsicum, herbs and nuts. Toss to combine. 
  • In a small dish combine zest, juice, soy, sugar and oils and mix well. Add to salad and toss to combine. 

Thursday 19 January 2012

Chocolate Caramel Cheesecake

Over on Taste forums a week or so ago someone put out a request for a Mars Bar cheesecake. There are plenty of recipes around for mars bar cheesecake, most of which involve chopping up and/or melting Mars bars into a cheesecake mix. However that wasn't what this person was looking for. Described as having discrete layers of caramel, cheesecake and chocolate all in a biscuit base so, looking for something creative to do, I thought I would give it a shot to come up with something. 

The caramel layer was easy enough, I just boiled a can of sweetened condensed milk. Although unfortunately I didn't boil it quite long enough so it is a touch runny. The chocolate layer was simple enough, a softish ganache made from equal quantities of cream and dark chocolate. You could make a firmer ganache but I wanted something nice and soft. My main issue was how to make the cheesecake layer "Mars bar-ish". I looked at some chilled cheesecake recipes. I looked up nougat filling recipes wondering if I could combine the two. Discarded most ideas with the thought of them being overly sweet and decided in the end I to go with something really simple. I added a good slug of vanilla extract (paste would have been better but I don't have any at the moment) and used dark brown sugar in the mix instead of white or icing sugar. The result is, if I do say so myself, rather spectacular. It it doesn't quite have the taste of a mars bar, the tang of the cream cheese still there. You could add more sugar if you want, I hedged my bets on that last night when I was making it as I though maybe with the sweetness from the caramel it would be overpowering. For me personally it is perfect but please do it to your own taste. Out of this recipe I made 1 x 15 cm tart and 2 x 6 cm tarts, it would probably fit perfectly into a 20 cm round x 3 cm deep tart tin.

Chocolate Caramel Cheesecake

1 400 g tin sweetened condensed milk (you could also use Top'n'fill)
50 g butter, melted
250 g cream cheese
100 ml double cream (you could used thickened I think)
2 tsp vanilla extract 
3 tbsp dark brown sugar 
100 ml pure cream (you could used thickened)
100 g dark chocolate, finely chopped

Method: 

Simmer tin of sweetened condensed milk in a large pot of water, making sure that the water is at least 2.5 cm over the top of the tin at all times, for 3 - 4 hours. (If you let the water level drop below the tin it can explode, please be VERY careful when doing this, other methods for turning sweetened condensed milk in to caramel are discussed here or here
Finely grind cookies in a processor or you can put them in a bag wrap with a tea towel and beat with a rolling pin or meat mallet. (The rolling pin method is particular good if you are stress or frustrated. LOL) Combine crumbs with melted butter and press firmly into base and sides of a tart tin. Refrigerate for at least 30 minutes. 

Beat cream cheese in a mixer, or by hand, until light and fluffy. Add double cream and beat to combine. Add vanilla and sugar and beat until sugar has dissolved. 

Spread caramel in an even thick layer in the tart tin. (I only used about 2/3 of my tin of caramel). Top with the cheesecake mixture leaving about 1/2 cm space at the top for the chocolate. Refrigerate for at least 1 hour. 

Heat cream in a small saucepan until small bubbles start to form around the edges (just before boiling point). Place chocolate in a glass or ceramic bowl and pour over cream. Whisk continuously until chocolate has melted. Allow to cool slightly and pour over cream cheese layer (I ended up with quite a bit of chocolate left over perhaps try 80g/80ml) and refrigerate for at least 4 hours or overnight. 


Monday 16 January 2012

Happy 2nd Birthday - Coconut Tres Leches Cake

Happy 2nd birthday to my little blog! I forgot the first birthday last year but I was determined not to forget this year. I am so pleased that I started up blogging. I know that did blog as much last year as I did in my first but I am hoping to do more this year. I am trying to keep on top of my diet this year. I did manage to lose 15 kg last year which I was so very pleased with but I still have plenty more weight to lose. I do refuse, however, to starve and/or seriously deprive myself. I know myself too well and know that if I do those things that I just rebel. So will I hope to have more healthy and lighter recipes on here this year there is still be some desserts and indulgent and luxurious meals too. 
For a birthday you just have to have a lovely dessert and this one is a wonderful one. I had made it before about 3 or 4 years ago and just love it. I had a bbq with friends on the weekend and it was requested that I bring a dessert. Actually I am always requested to bring a dessert, lol. Not that I mind at all, I so love to make desserts. This one was a huge hit, everyone just raved about it and pretty much every one had seconds. The first time I made it I topped it with sliced mango and shaved fresh coconut. I think it was better with the strawberries, blueberries & kiwi fruit.

Coconut Tres Leches Cake

Ingredients

6 eggs, separated
3/4 cup sugar
1 cup plain flour
400 g can sweetened condensed milk
1/2 cup evaporated milk
1/2 cup coconut milk
1 tsp vanilla
1 1/2 cups cream
Fruit to top (eg berries, kiwi fruit, mango, passionfruit)
Shaved coconut (optional)

Method

Heat oven to 160 C (140 C fan-forced).

Grease 32 cm x 22 baking dish.

Beat yolks and sugar on high speed until pale yellow and fluffy.

Whip egg whites to peaks. With rubber spatula, stir about 1/3 of egg whites into yolks and then gently fold in remaining whites.

Sift flour over egg mixture and using a rubber spatula to gently fold in until there are no more white flour streaks being careful not to over mix.

Bake until puffed and golden and the edges pull away from the sides of the pan, 20 to 25 minutes.

Remove from oven and place pan on a wire cooling rack. With a toothpick, poke holes all over the cake. Allow to cool for 15 minutes.

In a jug combine the milks and vanilla and then pour mixture evenly over cake. Continue to cool cake for another 45 more minutes and then cover tightly with plastic wrap and refrigerate overnight.

Turn cake out onto a serving plate, you may need to use a spatula to lift around the edges and then tap on the bottom of the pan, it will eventually come out. (I had the centre of the cake stick but I just lifted it out and stuck it back in place...shhh)

Whip cream and cover cake with it then top with desired fruit and coconut, if using.


Sunday 15 January 2012

Beet, Feta & Almond Tart

I made this last Sunday night for dinner. I served it with a very easy Nectarine & Rocket salad. It was very good hot but quite rich. It was also very good cold for lunches during the week. In fact it may have been better cold than hot. The only thing I would change would be to use milk instead of the cream. That is definitely a personal taste thing though as I found it to be way too rich for me. I would also put a little bit less beet in next time too, although I had used 2 1/2 beets so when writing out the recipe I said to use 2. If you don't want to make your own pastry then you can just use some premade shortcrust pastry. This is my Gramma's pastry recipe and it is so easy to make. My Gramma used to make it with her own rendered lard, which of course, made an incredible pastry but butter works just as well.

Beet, Feta & Almond Tart

Pastry:

1 1/2 cups plain flour
125 g butter, cubed
1/2 tsp salt
1 egg, lightly beaten
1 tbsp white vinegar
water to make up 1/2 c with egg & vinegar

Combine flour & salt, cut in butter. Combine egg & vinegar and add water. Add slowly to flour & butter mixture until you get a soft pastry. (You probably wont need all the liquid) Wrap in glad wrap and refrigerate for 20 minutes.
Roll out and line tart pan. Chill in freezer for 20 minutes.
Pre-heat oven to 180 C.
Line pastry shell with baking paper and fill with pie weights/beans/rice and bake for 15 minutes. Remove baking paper and weights and return to oven for a further 10 - 15 minutes or until slightly golden.

For filling:

2 medium beets, roasted until tender, cooled and chopped
2 or 3 spoons of caramelised onions (I had some in the freezer, if cooking probably about 1/2 a red onion slice & cooked)
about 100 g marinated feta (I just used as much as I wanted)
1/4 parmesan, finely grated
3 eggs, lightly beaten
185 ml (3/4 c) cream, (I would probably use 150 ml milk next time it was a bit rich for me)
1 - 2 tbsp sliced almonds

Combine beets and onions and put into tart shell. Top with crumbled feta and half the parmesan.
Combine eggs & cream and pour into tart shell.
Place tart pan on a baking tray and bake at 180 C for 20 minutes.
Top with remaining parmesan and almonds and return to oven for a further 15 minutes or until set and golden.


Tuesday 10 January 2012

Pork & noodle salad with pomegranate vinaigrette

I am so very tired tonight. I really haven't been sleeping very well lately and it all does catch up with me after a while. Hopefully I will get some better sleep tonight. Although one night of decent sleep really doesn't make up for multiple nights of bad. So perhaps I should wish for a week of good sleep. 

I made this dish on the weekend. It was very loosely based on a Jamie Oliver recipe that I made quite some time ago. I had really enjoyed that recipe and had always wanted to make it again. I recently bought a large amount of meat from my local butcher including several kilos of Aussie style spare ribs which I think is really belly slices. I thawed some of those for this recipe. I also changed the base from rhubarb to pomegranate. The rhubarb in my garden is not producing and it is so expensive to buy. I had purchased a bottle of pomegranate juice recently to make a punch but ended up not making it so thought that it would be perfect for this dish. I was really pleased with how this turned out and this and Jamie's original recipe will definitely remain in my mind for making again in the future. 

Pork & noodle salad with pomegranate vinaigrette

For pork:

4 pork spare ribs, skin remove and cut into bite size pieces
100 mls pomegranate juice
1  - 2 tbsp chili garlic sauce 
1 inch piece ginger finely grated 
1 - 2 tbsp honey

Combine all ingredients in a bowl (glass/ceramic is probably best) and marinate, refrigerated, for at least 4 hours but overnight would be best. 
Heat a wok over high heat and add 1 - 2 tbsp peanut or grapeseed oil. Drain meat and cook in batches until cooked through and starting to caramelise. 

For noodle salad: 

200 g packet singapore noodles
1/2 cucumber, strips peeled, de-seeded & sliced 
1/2 red capsicum, de-seeded & thinly sliced 
1/2 red onion thinly slice 
Punnet cherry tomatoes, quartered (I had home grown) 
1/4 c chopped mint & parsley
Alfalfa sprouts (or whatever sprouts you fancy) 

Place noodles in a bowl and cover with hot water & stand for 5 - 10 minutes. Drain, refresh with cold water and then drain well. Combine with salad ingredients. 

For vinaigrette: 

1 tbsp pomegranate juice 
2 tbsp olive oil 
1/2 tsp mustard 
Mix all ingredient until nicely emulsified. 

Add pork to noodle salad ingredients and pour over dressing and toss to combine. Serve immediately.


Monday 9 January 2012

Ham, Lychee & Baked Ricotta Salad

Just a quick post tonight goes with what a quick meal this was. It was incredible though. Whilst in the supermarket getting more milk I saw that the lychees were on special so I purchased a bunch of them. I just love lychees. I love to just sit with a bowl and a paring knife and just eat them. Last year I made a tart with some of my left over ham and served it with a salad that contained nectarines and it was very good. So I wondered whether ham and lychees would go together and they did, wonderfully. I had also purchased some baked ricotta while I was in the supermarket so added that in as well. I think that perhaps it might have been better with feta although I had been worried about it being too salty with the ham. For the dressing I made a simple raspberry vinaigrette which had just the perfect amount of sweetness to go with it. 

I don't really have amounts for you, I just piled some stuff on a plate until it looked right so I will just give you the ingredients. 

Ham, Lychee & Baked Ricotta Salad

Shaved ham 
Lychees, peeled & halved 
Red onion slices 
Tomato, cut into wedges 
Baked ricotta, cut into wedges
Mixed salad leaves 
Bread, toasted & cut into cubes (I used pasta dura) 

Vinaigrette: 

Raspberry vinegar
Mustard 
Olive oil


Sunday 8 January 2012

Redcurrant & Balsamic Glazed Ham

Happy new year to all of you that are reading my little blog. I am not sure how much I will be posting. I am still not feeling very inspired to write much about food. I wasn't really that inspired to cook much either until the past week or so. I have gotten back to menu planning and have stuck to it reasonably well so far. 

Since I was away for Christmas I didn't make myself a ham before I went away however once I got home I decided that it would be a good idea to buy a ham and glaze it so that I could get some meals out of it and then slice it up and vacuum pack it in portions for me to have throughout the year. I ended up buying an exceptional ham from my local butcher. I got them to remove the skin and score the fat for me, so that was two less steps for me to do. 

I decided to go with this recipe over on Taste.com.au. However, I didn't have much cranberry sauce left but I did have a jar of redcurrant jelly in the cupboard so I decided to use that as suggested in the notes. I also added some wholegrain mustard into the glaze mixture, probably 1 - 2 tablespoons. I also pour over about a third of the glaze and then basted with more every twenty minutes for an hour. It was lovely and caramelised after that. The ham itself was smoky and salty and the glaze was the perfect contrast to that. I really enjoyed this glaze. I would like to try it with the cranberry sauce as the original recipe intended.